



What to Inspect
Before you look higher up the wall, inspect the assembly. Focus on three leak paths: the caulk line between the window frame and trim, corner trim joints, and the sill joint where moisture can sit. If you see cracked caulk, separated corners, or soft, stained trim, moisture is getting behind the casing. When trim feels soft, we treat that as a warning sign, not just a cosmetic issue. It usually means water has been sitting there longer than the homeowner realized. If the window is wrapped in metal, check the wrap seams and fastener holes, since damaged wood and failed caulk can be hidden behind it. If everything looks tight and solid here, move up next to the roof-to-wall flashings and the wall above it.
How to Repair
Start by removing failed caulk, cleaning the joint, and re-caulking with an exterior-grade sealant made for windows and trim. If trim is soft or stained behind metal wrap, the wrap may need to come off so the wood can be repaired and rewrapped with new metal trim wrap. If the frame or sill is failing from rot, replacing the window assembly is often the only repair that stops the leak long-term.
Leaks From the Small Roof Overhead
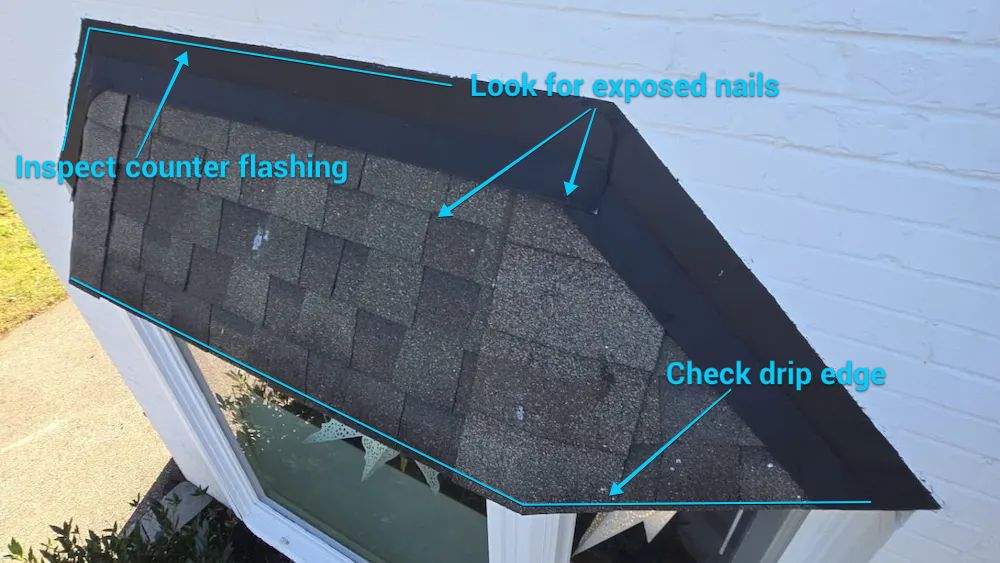
What to Inspect
Take a look at the small roof over the bay. Check for cracked shingles, missing pieces, or edges that are starting to lift. Pay extra attention to the bottom edge and the corners, since that is where wind-driven rain likes to sneak in. On these small bay roofs, the corners are often where small installation mistakes turn into repeat leaks. A tiny opening can let in a surprising amount of rainfall during a storm. If the roofing is more flat than steep, look at the seams. Any split, bubble, or open lap can cause a roof leak by letting moisture under the surface. Also check the metal drip edge. If it is loose, bent, or missing, water can run back under the roofing and soak the wood.
How to Repair
Replace any cracked shingles or worn roofing instead of patching it with sealant. Repair split seams on low-slope areas and tighten any loose edges. Reset exposed nails or screws and seal them the right way. If moisture is sneaking in at the edge, fix the drip edge and underlayment so rainwater drops off, not back under.
Roof-to-Wall Flashing
What to Inspect
This is a common leak spot because it is where two surfaces meet. The bay window roof runs into a vertical wall, and that seam has to be protected by flashing. If the flashings are loose, rusted, or sealed poorly, moisture can slip behind it and soak the wall. This is one of the first areas we check because caulked-over flashings often look “fixed” from the ground but still leaks behind the wall.
Start by looking at the line where the metal or lead flashing meets the wall. Watch for gaps, bent sections, or sealant that is cracked or missing. If your home has siding, check for signs the flashings are not tucked behind the siding. If your home has brick, look closely at the mortar line where the cover flashings meet the wall. If that seal is failing, wind-driven rainfall can get behind the brick and travel down.
How to Repair
A lasting repair usually means rebuilding the flashing, not patching it with caulk. Our team will remove the weak materials, install fresh underlayment, and add new flashings that are layered to shed rainwater back onto the roof. With siding, the flashing has to sit behind the house wrap and under the siding courses. With brick, the counterflashings should be set into a mortar joint and sealed correctly so rainwater cannot run behind it.
Siding or Brick Above
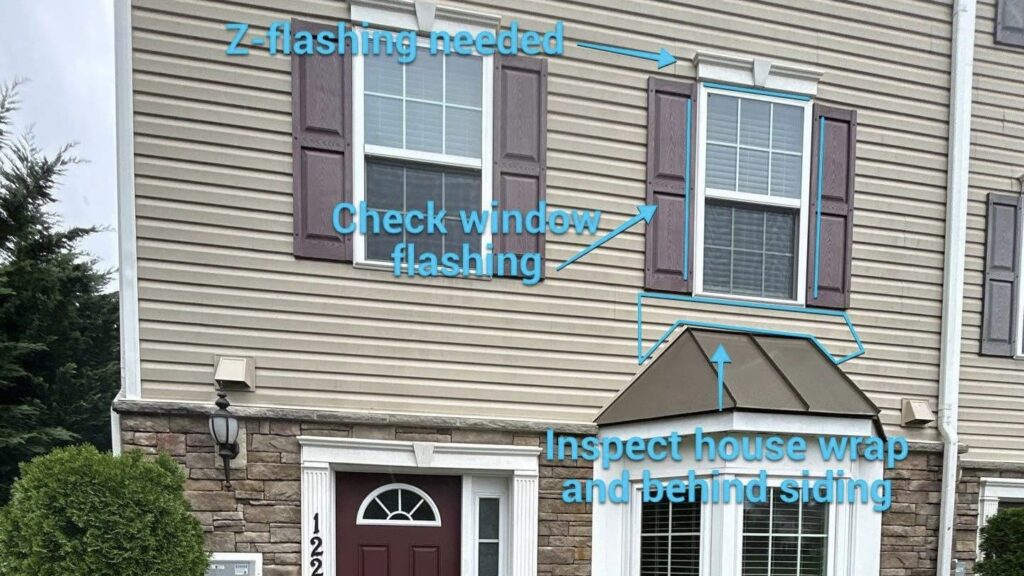
What to Inspect
After inspecting the roofing and flashings, look at the wall above. Moisture can slip behind siding or brick and run down inside the wall to the bay window. We see this often when the actual failure is higher up the wall. Water follows gravity, framing, and sheathing, so the leak can show up far below the entry point. With siding, the usual issue is the layer behind it. If house wrap is missing, torn, or not taped, rainfall can get to the sheathing and travel downward. Check seams, corners, and the siding edge right above the roofline. With brick, moisture rarely comes straight through the brick face, but cracks in mortar or gaps where brick meets trim can let wind-driven rain into the wall cavity.
How to Repair
On siding, the real fix is restoring the moisture barrier. Our skilled roofers will open the area, repairing house wrap, adding flashing tape at seams, and installing proper wall flashing above the roofline. On brick, repairs usually mean repointing cracked mortar, resealing joints where materials meet, and correcting it so water sheds out instead of into the wall.
Leaks From Above
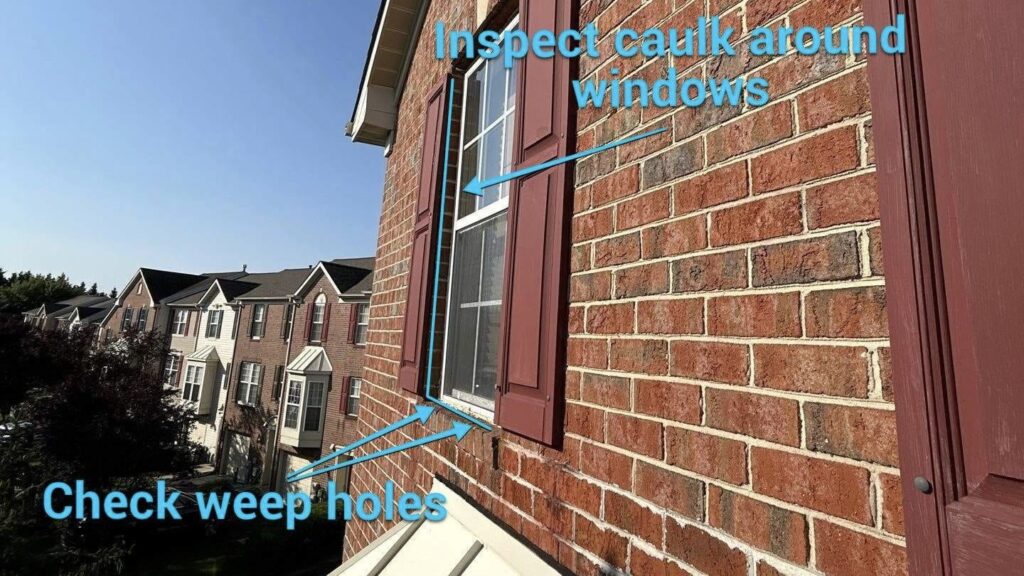
What to Inspect
If the bay window is leaking but the roof and flashing look solid, check the windows above it. Moisture can sneak in around that upper window, get inside the wall, and run down until it shows at the window below. This is why we always look above the leak, not just at the leak. Upper windows, trim joints, and missing head can all send water leaking down to the bay.
Start by checking the caulk and trim around the upper window. Look for cracked caulk and open corners. If you have siding, check the top and sides of the window. The top should have Z-flashing that kicks water out, and the sides should have window flashing tape. If you have brick, look for gaps where the frame meets the masonry.
Also check the weep holes in the window itself. If they are blocked, water can back up into the window and cause a leak.
How to Repair
Most repairs start with removing failed caulk, cleaning the joint, and re-caulking with an exterior-grade sealant. If the leak is coming from above the window, caulk alone won’t last. The longer-term fix is correcting the Z-flashing at the top and making sure the moisture barrier and flashing tape are properly installed behind the siding along the sides. If the window’s weep holes are blocked, clear them so the frame can drain the way it was designed to. In some cases, we may need to remove siding around the window to repair flashing tape, reinstall the head, and confirm water is being directed out and away.
Gutters and Downspouts Over the Area
What to Inspect
If gutters overflow above the location in question, rainfall can dump straight onto the wall and work its way behind the siding or overwhelm the flashing. We have seen clean-looking bay window details leak simply because the gutter above them was overflowing during heavy rainfall. Check for gutter clogs, sagging sections, and pooling after rainfall. Look for overflow marks on the fascia or siding. Also check the downspout. If it is clogged or discharging too close to the wall, moisture can soak the section of the wall and find a path inside.
How to Repair
Clean the gutter and downspout completely, then flush them to confirm water flows fast to the outlet. Fix the pitch so water does not sit in the gutter. Reseal seams and replace missing end caps. Add a downspout extension so water drains several feet away from the house. If water is shooting past the gutter, the gutter may need to be repositioned or upgraded.