


Skylight installation involves more than cutting an hole in the roof and setting a window in place. The location has to be compatible inside the room, through the attic, and on the roof. It may need structural framing, and the skylight has to be waterproofed and flashed into the existing roofing system.
RoofPRO has been installing skylights throughout Maryland for more than 20 years. We have worked on everything from straightforward replacements to new skylights that require framing, finished interior shafts, and custom flashing. Here is what homeowners can expect during the installation process.
Need a Skylight Installed in Maryland?
Before the Installation Begins
A successful skylight installation starts before anything is cut.
Choose the Right Skylight for the Roof
The first decision is what you want the skylight to do. A fixed skylight provides natural light but does not open. A venting skylight can be opened to bring fresh air into the room. Solar-powered venting skylights provide the same ventilation without requiring traditional electrical wiring. There are also roof windows designed for steeply pitched roofs and tubular skylights that bring natural light into smaller spaces through a reflective tunnel.
Roof pitch and roofing material matter too. A deck-mounted skylight is commonly used on sloped roofs, while curb-mounted skylights are often used on flat or low-slope roofs and for larger custom openings. The final choice should follow the requirements of the specific skylight being installed.
RoofPRO primarily recommends VELUX because of the quality of the skylights, their flashing systems, and the manufacturer training available to certified installers.
Plan the Location in Your Home and On The Roof
If the skylight fits between existing rafters, the framing portion of the project can be relatively straightforward. When the ideal skylight location crosses a structural member, more precaution may be required. The location may need additional headers, doubled framing, or other structural support before the existing framing can be modified. That adds labor and material, but it can also give the homeowner much more flexibility with skylight placement.
When structural framing changes require a permit, RoofPRO handles the necessary permitting as part of the project. We also plan the finished interior shaft during this stage. The shaft needs to connect the roof location to the ceiling below while leaving enough space for proper air sealing and insulation around the outside of the finished drywall.
Check the Roof Framing and Interior Space
If the skylight fits between existing rafters, the framing portion of the project can be relatively straightforward. When the ideal skylight location crosses a structural member, more work may be required. The opening may need additional headers, doubled framing, or other structural support before the existing framing can be modified. That adds labor and material, but it can also give the homeowner much more flexibility with skylight placement.
When structural framing changes require a permit, RoofPRO handles the necessary permitting as part of the project. We also plan the finished interior shaft during this stage. The shaft needs to connect the roof opening to the ceiling below while leaving enough room for proper air sealing and insulation around the outside of the finished drywall.
The Skylight Process
Every house is different, but most new skylight installations follow the same general process. Because it requires removing part of the roof and working from heights, we highly recommend hiring a professional, experienced roofing contractor and using proper fall protection throughout the job.
Step 1: Plan the Skylight From Inside the Home
We start inside because the skylight ultimately needs to look right from the area below.
The skylight location is marked on the ceiling, and we confirm where that location will pass through the attic and reach the roof. We check the rafters, attic space, and roof location before making it permanent.
This prevents a situation where it looks perfect from inside but lands directly beside a roof valley, pipe, or another feature outside.
Step 2: Frame the Skylight Opening
Once the location has been confirmed, the ceiling can be opened and the skylight frame for the shaft can begin.
If it fits between the existing rafters, framing can be built around that rough opening. If structural members need to be altered, the surrounding framing has to be reinforced before anything is removed.
The shaft is then framed from the ceiling toward the roof. We also plan for the air sealing and insulation that will surround the finished shaft.
This is one of the biggest differences between a new skylight install and a simple replacement. With a replacement, that structure is usually already there.
Step 3: Remove the Roofing and Open the Roof
Once the interior layout and framing are complete, we move to the roof.
We remove enough roofing around the planned skylight to properly waterproof and flash the new location. On a typical installation, that may mean removing roughly one foot of roofing along each side and below it, along with about two feet above it.
The exact amount changes depending on the roofing material and installation.
Once the area is exposed, the roof deck can be cut to create the skylight opening. The dimensions need to match the skylight framing below so the unit can sit correctly.
Step 4: Set and Secure the Skylight
The skylight is placed into the prepared location and aligned before it is permanently fastened.
Framed openings are not always perfectly square, especially when working on an existing home. The skylight still needs to be positioned correctly so the mounting flange and flashing system can sit as intended.
We secure it according to the manufacturer’s fastening pattern. Fasteners also need to sit properly because a nails or screws that is left raised can interfere with the flashing installed over it.
Small details at this stage affect everything that follows.

Step 5: Install the Ice and Water Shield
Before the metal flashing goes on, we install a self-sealing waterproofing membrane around it.
This is commonly referred to as ice and water shield. The membrane adheres to the roof deck and helps seal around a fastener that penetrates it.
We typically go from the bottom upward so every layer overlaps the one below it and continues directing water toward the exterior.
The membrane also needs to sit flat. Wrinkles and raised areas may interfere with the flashing that will eventually sit over it.
At the top of skylights, the waterproofing needs to properly tie back into the roof underlayment. If moisture ever gets beneath the roofing farther up the slope, the goal is for it to continue over the skylight waterproofing instead of getting behind it.
Step 6: Install the Flashing
Flashing is one of the most important parts of installation.
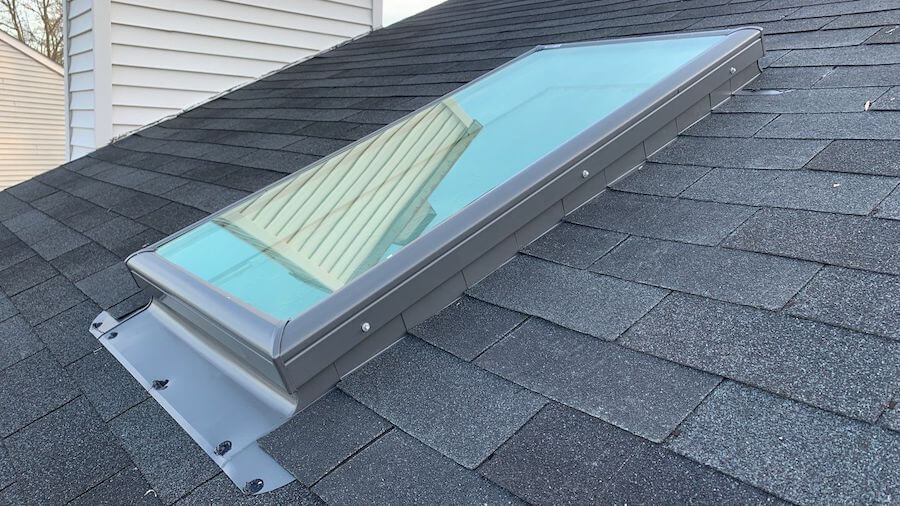
When a manufacturer offers a flashing kit designed for the skylight and roofing system, we prefer to use it. These systems are made to integrate the skylight with the surrounding roof.
The bottom, or sill flashing, directs water onto the roofing below the skylight. Along the sides, pieces of step flashing are installed with the roofing so each course overlaps the one below it.
The top flashing handles water coming down the roof toward the skylight.
Different roofs require different details. Asphalt shingles, slate, metal, tile, and flat roofing do not all flash the same way. If a skylight is custom-sized or the roof presents an unusual condition, RoofPRO can fabricate custom flashing on site.
Step 7: Reinstall the Roofing
Once the waterproofing and flashing are in place, the surrounding roofing can be rebuilt.
With shingles, the roofing and step flashing are integrated together as we complete both sides of the skylight. Other systems require their own methods for tying the new installation back into the existing roof.
The goal is not simply to make the repair look finished. Every layer needs to continue moving water down and away from the opening.
Even the type of shingle can change the installation. Oversized designer shingles, for example, may require different spacing or additional flashing compared with a conventional architectural shingle.
An installer has to be able to adapt to the roofing system while still following the manufacturer’s installation requirements.
Step 8: Finish the Interior Skylight Shaft
After the exterior is watertight, we finish the inside.
The shaft is insulated and air sealed to separate the conditioned living space from the attic. Drywall is then installed and finished around the fixture, followed by trim and painting where needed.
RoofPRO handles this interior work as part of our skylight installations rather than leaving the homeowner with an unfinished opening.
On the recent Severna Park project, we protected the kitchen counters and floors before opening the ceiling. After installing the two skylights, we built the shafts, added insulation, completed the drywall and trim, and finished the interior openings.
Step 9: Set Up and Test Venting Skylights
If the skylight opens, has a solar shade, or uses another powered accessory, we test those components before finishing the job.
That may include programming the remote, testing the venting mechanism, operating the shades, and checking any other features included.
If several skylights are installed in the same area, certain skylight systems can also be configured so the homeowner can operate them together rather than controlling each one separately.
Installing a New Skylight vs. Replacing an Existing Skylight
Replacing an existing skylight is usually much simpler than creating an entirely new aperture.
The framing and interior shaft are already there, so most of the installation takes place on the roof. We remove the roofing around the skylight, take out the old unit and flashing, inspect the fissure, install the new skylight, waterproof it, install new flashing, and rebuild the surrounding roofing.
A typical replacement often takes around two to four hours. A new skylight with a finished shaft generally takes around two to three days because we are creating the opening, framing the shaft, insulating it, installing drywall, and finishing the interior. More complicated projects involving structural modifications, large openings, or custom design can take approximately two to five days.
Older skylights can create another issue. Sometimes the original size or model is no longer manufactured. In those cases, we may need to adjust the opening or create new interior trim so a modern skylight fits the existing space correctly.
The Cost of Installing a New Skylight
The cost depends heavily on whether we are replacing an existing unit or creating a completely new aperture.
A typical skylight replacement usually falls between $800 and $2,000 for an average-sized unit. That range can vary depending on the skylight, roofing products, flashing, accessibility, and condition of the existing opening.
A new skylight installation that requires opening the ceiling, framing a shaft, insulating it, installing drywall and trim, and completing the roofing generally ranges from $2,000 to $5,000.
Some projects fall outside those ranges.
We have installed a skylight that measured roughly five feet by five feet and required a custom curb because it was being positioned over a tree growing inside the homeowner’s living space. A project like that requires more material, framing, waterproofing, labor, and custom work than a typical residential skylight.
That is why an on-site inspection is the best way to establish an accurate installation price.
Installation on Different Roof Types
RoofPRO installs skylights on asphalt shingles, metal, slate, tile, TPO, EPDM, and other flat roofing systems.
The overall process may be similar, but the way the skylight integrates with the roof changes considerably.
A shingle roof commonly uses step flashing woven into the shingles. Metal roofing requires flashing that works with the panel system. Slate and tile require more care when removing and reinstalling the surrounding roofing material.
Flat and low-slope roofs commonly use curb-mounted skylights. The roofing membrane is brought up and integrated with the curb so water cannot reach the opening below.
The skylight, flashing, and roofing system need to be planned together rather than treating the skylight as a separate product sitting on top of the roof.
Why Skylight Flashing Matters So Much
Of every part of an installation, flashing is one of the areas we pay the closest attention to because it is also where we find many existing skylight leaks.
Think about what happens when it rains. Rainwater from the entire section of roof above the skylight travels toward that aperture.
The flashing has to intercept that water, move it around both sides of the skylight, and return it to the roofing surface below.
Maryland weather puts those details to the test. Heavy rain, snow, and ice can expose small weaknesses that may not show up immediately after installation.
That is why the flashing kit, ice and water shield, fastener placement, roof underlayment, and roofing material all have to come together.
Common Skylight Mistakes
Many of the skylight leaks we inspect are not caused by a problem with the glass. They come from the details surrounding the skylight.
- One mistake is placing a nail in the wrong location. A fastener can create a direct path for water if it penetrates an area that should remain protected.
- Reusing old flashing is another problem. Installing a new skylight but trying to rely on worn or incompatible flashing leaves one of the most important parts of the system unchanged.
- We also see problems around the top flashing. Rainwater traveling down the roof reaches the upper side of the skylight first. Melting snow, and ice can push water farther beneath the roofing in this area, which makes the waterproofing underneath especially important.
- Sealant can create problems too when it is used incorrectly. Caulk should not be relied on to compensate for improperly layered flashing. In some cases, poorly placed sealant can actually block the intended drainage path and redirect rainwater somewhere it should not go.
These details may seem small during installation, but they are often the difference between a skylight that performs properly and one that starts leaking during the next major storm. If your skylight is showing signs of damage or other issues, contact us today for a free skylight repair service estimate.
Get a Free Skylight Installation Quote
RoofPRO has more than 20 years of experience providing professional installation of skylights on Maryland homes. We are licensed and insured, VELUX certified, and BBB Accredited with an A+ rating. Our team can inspect your roof, attic, and interior space, determine what the installation will require, and provide a free quote for the complete project. Need more than new skylights? RoofPRO also offers windows, doors, siding, and roofing services. Contact our trusted team at RoofPRO today.